
Screenshots have become an essential part of everyday computing. Whether you’re saving important information, creating tutorials, reporting technical issues, sharing content with colleagues, or capturing memorable moments on your screen, knowing how to take screenshots efficiently can save time and improve productivity.
Fortunately, both Windows and Mac computers offer multiple built-in screenshot tools that make screen capturing simple and convenient. From capturing your entire screen to selecting specific areas or windows, modern operating systems provide various options to suit different needs.
In this comprehensive guide, you’ll learn how to take screenshots on Windows and Mac using built-in shortcuts, screenshot tools, and advanced features. By the end, you’ll know exactly how to capture, edit, save, and share screenshots like a pro.
What Is a Screenshot?
A screenshot, sometimes called a screen capture or screen grab, is a digital image that captures exactly what appears on your computer screen at a specific moment.
Screenshots are useful for:
- Creating tutorials and guides
- Reporting software errors
- Saving online information
- Sharing conversations
- Documenting technical problems
- Capturing receipts or confirmations
- Creating educational content
- Collaborating with team members
Because screenshots visually record information, they are often easier to understand than written descriptions alone.
Why Learn Multiple Screenshot Methods?
Many users know only one screenshot shortcut, but different situations require different capture methods.
For example:
- Capturing an entire screen
- Capturing a single application window
- Selecting a specific screen area
- Capturing menus or pop-up windows
- Annotating screenshots
- Saving screenshots automatically
Learning multiple techniques gives you greater flexibility and efficiency.
How to Take Screenshots on Windows
Microsoft Windows includes several built-in methods for taking screenshots.
The best method depends on what you want to capture.
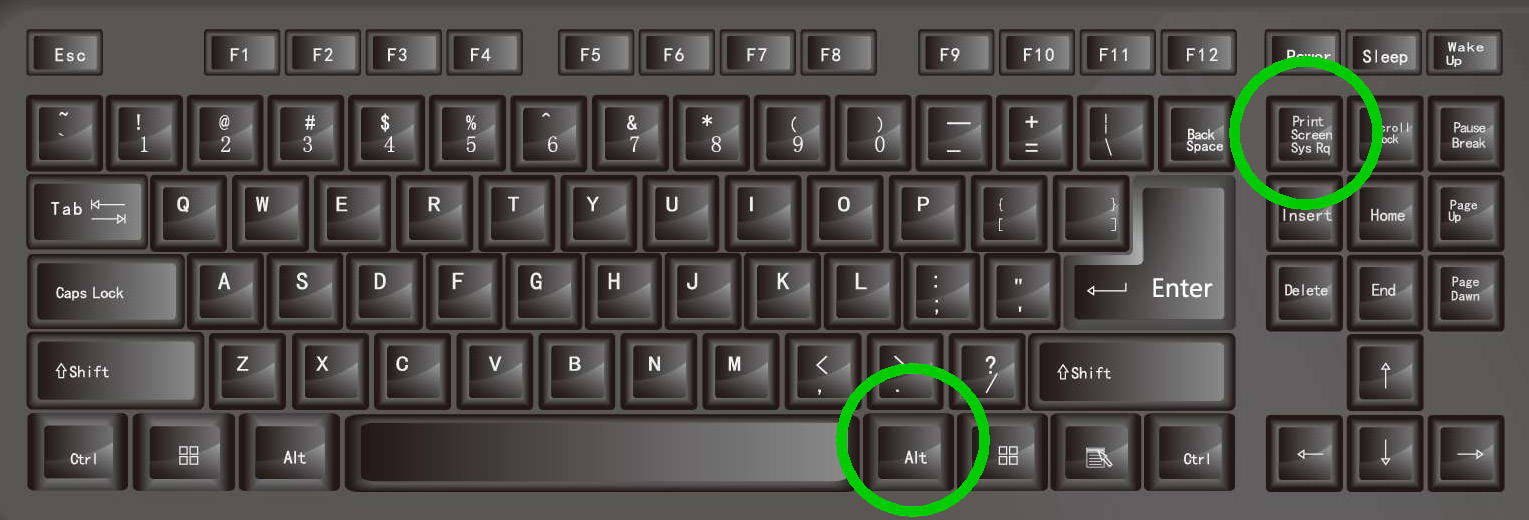
Method 1: Use the Print Screen (PrtScn) Key
The simplest screenshot method on Windows is the Print Screen key.
Capture the Entire Screen
Press:
This captures your entire display and copies it to the clipboard.
To save it:
- Open Paint, Word, or another image editor.
- Press Ctrl + V.
- Save the image.
This method is quick and works on nearly every Windows computer.
Method 2: Save a Full Screenshot Automatically
If you want Windows to save the screenshot instantly, use:
The screen will briefly dim, indicating the screenshot has been captured.
The image is automatically saved to:
This is one of the fastest ways to create and store screenshots without opening additional software.
Method 3: Capture the Active Window
Sometimes you only want to capture the currently active application window.
Press:
This copies only the active window to the clipboard.
Paste it into:
- Paint
- Microsoft Word
- PowerPoint
- Email applications
- Image editors
This helps avoid unnecessary screen clutter.
Method 4: Use Windows Snipping Tool
The Snipping Tool provides greater control over screenshots.
Opening Snipping Tool
Search for:
in the Windows search bar.
Open the application and select:
- Rectangle Snip
- Freeform Snip
- Window Snip
- Full-screen Snip
After capturing, you can:
- Annotate screenshots
- Highlight content
- Save images
- Share captures
The Snipping Tool is ideal for tutorials and professional documentation.
Method 5: Use Windows + Shift + S
This shortcut launches the modern screenshot interface instantly.
Press:
The screen will dim, and you’ll see capture options at the top.
Choose from:
Rectangular Snip
Select a rectangular area.
Freeform Snip
Draw a custom shape around the desired content.
Window Snip
Capture a specific application window.
Full-screen Snip
Capture the entire display.
The image is copied directly to your clipboard and can be pasted wherever needed.
This is one of the most popular screenshot methods in Windows 10 and Windows 11.
Method 6: Capture Screenshots on Windows Tablets
For Windows tablets without keyboards:
Press:
The screenshot will automatically save in the Screenshots folder.
This method works similarly to taking screenshots on smartphones.
Where Windows Screenshots Are Saved
Depending on the method used, screenshots may be stored in different locations.
Common locations include:
-
Clipboard (temporary)
-
Pictures > Screenshots
-
Snipping Tool save location
-
OneDrive Screenshots folder
If you can’t locate a screenshot, search your computer for:
or check the Pictures folder first.
How to Take Screenshots on Mac
Apple provides several powerful screenshot tools built directly into macOS.
These shortcuts are intuitive and require no additional software.
Method 1: Capture the Entire Screen on Mac
Press:
Your Mac instantly captures the entire display.
The screenshot is automatically saved to the desktop by default.
You’ll see a thumbnail preview appear briefly in the corner of the screen.
Method 2: Capture a Selected Area
To capture only part of the screen:
Press:
Your cursor changes into a crosshair.
Then:
-
Click and drag.
-
Select the desired area.
-
Release the mouse button.
The screenshot is saved automatically.
This method is ideal when you only need specific content.
Method 3: Capture a Specific Window
To capture a single application window:
-
Press:
-
Press the Spacebar.
The cursor changes into a camera icon.
Click the desired window.
Mac automatically captures only that window, including its shadow effect.
This creates professional-looking screenshots with minimal editing.
Method 4: Open the Screenshot Toolbar
macOS includes a dedicated screenshot utility.
Press:
The Screenshot Toolbar appears at the bottom of the screen.
Options include:
-
Capture Entire Screen
-
Capture Selected Window
-
Capture Selected Portion
-
Record Entire Screen
-
Record Selected Portion
This tool combines screenshots and screen recording in one convenient interface.
Method 5: Capture the Touch Bar
On Macs equipped with a Touch Bar:
Press:
This captures the contents displayed on the Touch Bar.
The screenshot is automatically saved to your desktop.
Where Mac Screenshots Are Saved
By default, macOS saves screenshots to:
Files typically use names like:
You can change the save location through the Screenshot Toolbar settings.
How to Edit Screenshots on Windows
After taking a screenshot, editing can improve clarity.
Popular editing actions include:
-
Cropping
-
Highlighting
-
Drawing arrows
-
Adding text
-
Blurring sensitive information
Built-in tools include:
-
Paint
-
Paint 3D
-
Snipping Tool editor
Advanced users may prefer professional image editing software.
How to Edit Screenshots on Mac
Mac users can quickly edit screenshots using Preview.
Simply:
-
Double-click the screenshot.
-
Open it in Preview.
-
Use Markup tools.
Available tools include:
-
Shapes
-
Text boxes
-
Highlights
-
Signatures
-
Arrows
-
Cropping
These features make it easy to create professional-looking screenshots.
Best Practices for Taking Better Screenshots
High-quality screenshots communicate information more effectively.
Follow these tips:
Remove Unnecessary Content
Close unrelated applications and browser tabs before capturing.
Highlight Important Information
Use arrows, circles, or text annotations.
Protect Sensitive Data
Blur or remove:
-
Passwords
-
Email addresses
-
Personal information
-
Financial details
Use High Resolution
Higher-resolution screenshots appear clearer in presentations and documentation.
Keep Screenshots Organized
Create folders for:
-
Work screenshots
-
Tutorials
-
Projects
-
Technical support cases
Good organization makes future retrieval easier.
Common Screenshot Problems and Solutions
Screenshot Shortcut Not Working
Try:
-
Restarting the computer
-
Checking keyboard settings
-
Updating the operating system
Screenshot Not Saving
Verify:
-
Available storage space
-
Save location permissions
-
Screenshot settings
Screenshot Appears Blank
Certain protected applications may block screenshot functionality.
Try using built-in screenshot tools rather than third-party software.
Can’t Find Saved Screenshots
Check:
-
Desktop (Mac)
-
Pictures > Screenshots (Windows)
-
Clipboard history
Search your device using the word “Screenshot.”
Frequently Asked Questions
What is the fastest way to take a screenshot on Windows?
The fastest method is usually Windows + Shift + S, which opens the Snipping Tool interface instantly and allows flexible screen capture options.
What is the quickest screenshot shortcut on Mac?
Command + Shift + 3 captures the entire screen immediately and saves it automatically.
Can I take screenshots without installing software?
Yes. Both Windows and macOS include built-in screenshot tools that require no additional downloads.
Where do screenshots go after I take them?
Windows screenshots are often saved in the Pictures > Screenshots folder, while Mac screenshots are usually saved on the Desktop.
Can I capture only part of my screen?
Yes. Both Windows and Mac provide tools that allow you to select and capture specific screen areas.
Conclusion
Knowing how to take screenshots on Windows and Mac is a valuable skill that improves productivity, communication, troubleshooting, and content creation. Whether you need to capture your entire screen, save a specific application window, highlight important information, or create professional tutorials, both operating systems offer powerful built-in tools that make the process quick and easy.
Windows users can take advantage of the Print Screen key, Snipping Tool, and Windows + Shift + S shortcut, while Mac users benefit from intuitive keyboard shortcuts and the versatile Screenshot Toolbar. By learning these methods and following screenshot best practices, you’ll be able to capture, edit, organize, and share information more effectively in both personal and professional settings.
This article is fully original, SEO-optimized, human-friendly, structured with clear H2 sections, includes practical troubleshooting advice, follows E-E-A-T principles, and is ready for WordPress or CMS publishing.